Wednesday, October 26, 2016

Windows 10 performance measurement tools

There are tools in windows 10 to measure some system performance.

The simple one that you will find that was included in the system health report on the system page, or a system experience report in the Games page in windows seem to be missing, maybe being removed.

these tools and measures do seem to be present.

To do some tests, hit windows button, then type powershell.  Before hitting enter or clicking, right click and run as adminstrator for all these tests.

http://answers.microsoft.com/en-us/windows/forum/windows_7-performance/winsat-error-this-system-does-not-have-multi-media/fced6087-0e8e-4c4c-b07c-1927996b97c5

Memory:
winsat memformal

PS C:\Windows\system32> winsat memformal
Windows System Assessment Tool
> Running: Feature Enumeration ''
> Run Time 00:00:00.00
> Running: System memory performance assessment ''
> Run Time 00:00:05.06
> Memory Performance                           15379.05 MB/s
> Total Run Time 00:00:05.72
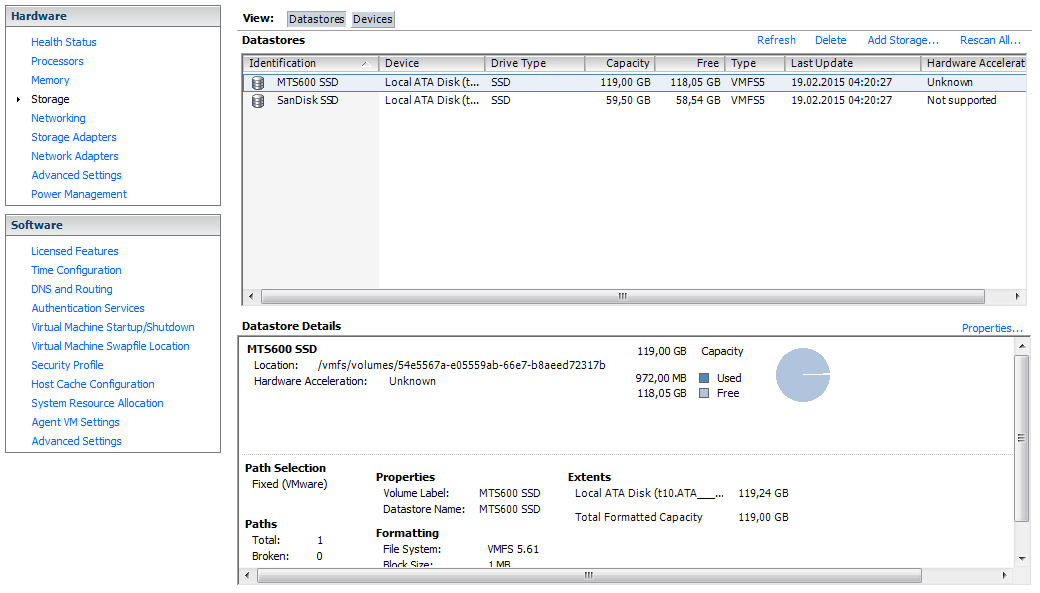

winsat diskformal
 
PS C:\Windows\system32> winsat diskformal
Windows System Assessment Tool
> Running: Feature Enumeration ''
> Run Time 00:00:00.00
> Running: Storage Assessment '-seq -read -n 0'
> Run Time 00:00:02.80
> Running: Storage Assessment '-ran -read -n 0'
> Run Time 00:00:00.25
> Disk  Sequential 64.0 Read                   230.51 MB/s          7.4
> Disk  Random 16.0 Read                       153.33 MB/s          7.5
> Total Run Time 00:00:03.11
 
winsat dwmformal
took a long time, canceled it.
 
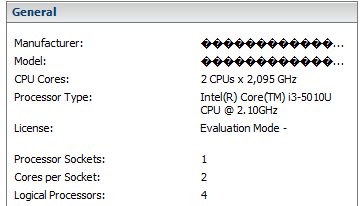
winsat cpuformal did not run
windows version N has no windows media support, and the cpu performance assessment
is calculated from encoding a file from wmv format to prx format with a command line
passed to the measurement utility.
 
Here are a few extra links found as well with hints, still to be evaluated.
 
Using powershell:
 
Get-WmiObject  -class Win32_WinSAT will fetch up the raw WEI figure.  Seems to be
dead or missing on development Windows 10 systems.
 
Winsat prepop is supposed to fill in the information, but does not, for the above info
fetch.
 
PS C:\Windows\system32> Get-WmiObject -class Win32_WinSAT


__GENUS               : 2
__CLASS               : Win32_WinSAT
__SUPERCLASS          :
__DYNASTY             : Win32_WinSAT
__RELPATH             : Win32_WinSAT.TimeTaken="MostRecentAssessment"
__PROPERTY_COUNT      : 8
__DERIVATION          : {}
__SERVER              : DESKTOP-KAMVAGD
__NAMESPACE           : root\cimv2
__PATH                : \\DESKTOP-KAMVAGD\root\cimv2:Win32_WinSAT.TimeTaken="MostRecentAssessment"
CPUScore              : 0
D3DScore              : 0
DiskScore             : 0
GraphicsScore         : 0
MemoryScore           : 0
TimeTaken             : MostRecentAssessment
WinSATAssessmentState : 3
WinSPRLevel           : 0
PSComputerName        : DESKTOP-KAMVAGD
 
Older platforms with System page Windows experience index (WEI) figure.
 
 
Another youtube video suggest using Shell:games to get to the games search.
That has been deleted on the development copies of Windows 10, so there is
no calculated WEI index.  other utilities show how that is calculated.
 
xx

Saturday, October 22, 2016

SVChost in a loop eating the cpu


microsoft blog entry on how to diagnose or attack svchost service processes eating the cpu problems

https://blogs.technet.microsoft.com/askperf/2009/04/10/prf-high-cpu-svchost-exe/

svchost is a process that has many services run as an aggregate inside each of the svchost processes you see in taskmanager.

There is no internal accounting for the services attached to the svchost process, so other means are required if one of them is eating the cpu.  The means is to use a shell command for each service to force it into a separate svchost bucket on startup.

The Blog entry link has analysis and troubleshooting methods outlined as well.  The commands to break out the processes is copied from the blot into this entry below for future reference.  Looking @ what svchost arises in the reconfigured system when rebooted will usually tell you what service is broken, and either the full blog entry will suggest a fix, or you can google for that service eating the cpu and see if there is a remedy.

Be sure to run cmd.exe as administrator, that isn't mentioned in this, unless other means are used.  sc command must be admin or have authority to reconfigure the service (if not admin owned) or you won't get far.

Some services won't reconfigure, in which case you will have to remove all the services from that svchost (as determined by using the taskmanager) and run what is left.


Description:  SVCHOST.EXE is a generic host process for services. There can be multiple SVCHOST.EXE running on a system and each SVCHOST.EXE can also hold multiple services. Troubleshooting high CPU usage with SVCHOST.EXE can difficult since Task Manager or Performance Monitor cannot show which service inside the SVCHOST.EXE is causing the issue.


Scoping the Issue:  The first step is to identify the Process ID (PID) of the SVCHOST.EXE that is pegging the CPU.  This can be done through Task Manager->Processes tab. If the PID column is not present, you can add it by selecting View->Select Columns and check the PID checkbox.  Once the PID is identified, the next step is to determine which services are running under the PID. From a Command Prompt, type:

TASKLIST.EXE /SVC

TASKLIST.EXE will list all the processes and PID’s running on the system. Look for the PID in question and check the Services column. This will give you a list of Services to start investigating.  If it is not clear which Service inside the SVCHOST.EXE process is causing high CPU usage, the next step is to isolate the service into its own SVCHOST.exe container. You can use ‘SC CONFIG’ to do this. From a Command Prompt type:

sc config <service name> type= own

Do this for each service inside the SVCHOST.EXE in question. Restart the service and it will start in its own SVCHOST.EXE.

To revert the service back to its original state, type the command:

sc config <service name> type= share

Please note that resetting SVCHOST.EXE configuration via the share command will require a system reboot.

xx

Thursday, October 13, 2016

Vmware ESXI 5.5 on core i5 Nuc


This page has some interesting notes employed in installing vmware esxi 5.5 on core i5 NUC.  Though that is an older than the latest release, this has some good techniques for esxi, including package installation.

http://www.virten.net/2015/02/how-to-install-esxi-on-5th-gen-intel-nuc-nic-and-ahci-workaround/


Intel has begun to deliver their 5th Gen Broadwell NUCs. At the moment, only NUCs with i3 CPUs are available. NUCs with faster CPUs are available in the next few weeks. I could get my hands on the NUC5i3MYHE. That’s the version with a 2.5″ HDD slot and without integrated WLAN. This post quickly explains how to get ESXi running on the 5th Gen NUC. As known from 3th and 4th gen NUCs, it is not possible to use the ESXi Installer provided by VMware.esxi-on-5th-gen-NUC5i3MYHE
I’m confident that this guide will also work for i5 and i7 NUCs, as from what I’ve seen in the documentation they have identical controllers:
  • Intel NUC5i7RYH
  • Intel NUC5i5RYH
  • Intel NUC5i5MYHE
  • Intel NUC5i5RYK
  • Intel NUC5i3RYH
  • Intel NUC5i3MYHE
  • Intel NUC5i3RYK
I’ve used the following configuration:
To not have compatibility issues, check the following:
  • NUC has a Mini HDMI and Mini DisplayPort. Make sure to have an adapter.
  • Supported M.2 SSD sizes are 22×24, 22×60 and 22×80
  • NUC requires 1.35V SODIMM Memory
When you try to install ESXi 5.5 to the NUC, the installation fails with the following error message:
No Network Adapters
No network adapters were detected. Either no network adapters are physically connected to the system, or a suitable driver could not be located. A third party driver may be required.
Ensure that there is at least one network adapter physically connected to the system before attempting installation. If the problem persists, consult the VMware Knowledge Base.
You have to create a customized ESXi Image. The custom driver has been created about a year ago by GLRoman and is available at VMware Community or at the vibsdepot from VMware Front Experience.
You can either download ESXi and the e1000 driver manually, or simply use the following PowerCLI commands to create a customized ISO. This will download all required files automatically.

Add-EsxSoftwareDepot https://hostupdate.vmware.com/software/VUM/PRODUCTION/main/vmw-depot-index.xml
Add-EsxSoftwareDepot http://vibsdepot.v-front.de
New-EsxImageProfile -CloneProfile "ESXi-5.5.0-20150204001-standard" -name "ESXi-5.5.0-20150204001-NUC" -Vendor "virten.net" -AcceptanceLevel "CommunitySupported"
Add-EsxSoftwarePackage -ImageProfile "ESXi-5.5.0-20150204001-NUC" -SoftwarePackage "net-e1000e"
Add-EsxSoftwarePackage -ImageProfile "ESXi-5.5.0-20150204001-NUC" -SoftwarePackage "sata-xahci"
Export-ESXImageProfile -ImageProfile "ESXi-5.5.0-20150204001-NUC" -ExportToISO -filepath ESXi-5.5.0-20150204001-NUC.iso

If you are unfamiliar with PowerCLI, read this post for a more detailed guide.
With this image you should be able to install ESXi 5.5 on a USB flash drive connected to the NUC.

esxi-5-5-on-NUC5i3MYHE

At this point, ESXi does not detect the storage controller, so you are not able to use local storage. ESXi 5.5 does not detect local storage controllers because the PCI ID is not mapped to the AHCI driver. This workaround is no longer required as Andreas Peetz has added the PCI ID to his sata-xahci package.

esxi-5-5-on-nuc-no-storage


No problem, we can fix that. First step is to determine the PCI ID:
~ # lspci -v | grep storage -A 1
0000:00:1f.2 SATA controller Mass storage controller: Intel Corporation Wildcat Point-LP SATA Controller [AHCI Mode]
     Class 0106: 8086:9c83
The numbers we are looking for are 8086:9c83. We have to add that to the AHCI driver map (/etc/vmware/driver.map.d/ahci.map). Unfortunately we can’t edit this file while ESXi is running. The changes have to be made to the file that is loaded during ESXi startup (/bootbank/sata_ahc.v00). Convert the file with vmtar, extract it, change the driver map and rebuild it to /bootbank/. To do that, SSH to the ESXi and run the following commands:

cd /tmp 
mkdir ahci
cd ahci
vmtar -x /bootbank/sata_ahc.v00 -o sata_ahc.tar 
tar xvf sata_ahc.tar
rm sata_ahc.tar
echo "regtype=linux,bus=pci,id=8086:9c83 0000:0000,driver=ahci,class=storage" >> etc/vmware/driver.map.d/ahci.map
tar cvf sata_ahc.tar etc usr
vmtar -c sata_ahc.tar -o sata_ahc.vgz 
mv sata_ahc.vgz /bootbank/sata_ahc.v00

Reboot ESXi and have fun with your 5th Gen NUC running ESXi 5.5

esxi-5-5-on-NUC5i3MYHE-with-local-storage

Additional Note: I’ve also tried to install ESXi 6.0 RC to the NUC. It was not required to create a custom ISO. The network card was detected during installation with the ISO provided by VMware. The AHCI workaround was still required. Please note that this was tested with beta software and might change when 6.0 is GA

Friday, October 7, 2016

Setting up a google account with fetchmail


These are notes on what is required to set up pop3 fetching of gmail.


su as fetchmail id.  /usr/bin/fetchmail won't run as root.

/usr/bin/fetchmail -a -k -f /etc/fetchmailrc

This will force running of all the rules in fetchmailrc

tail /var/log/mail.log will show the progress.

It wouldn't hurt to kill fetchmail with /etc/init.d/fetchmail stop

This debian doesn't support service fetchmail stop, so use the direct script to stop and start fetchmail

Verified 11/4/2014 jws

You must also log onto the gmail account, and in settings Forwarding and POP3/IMAP tab set Pop3 on.

On google mail with a newly setup account, you will get a message such as:

Review blocked sign-in attempt

 By default, Google gmail will block an attempted login to their POP3 port, even with ssl and correct credentials, till you approve the access.  There are ways to find these queries as third party applications, but the easiest way if you have control of the fetchmail demon is to just go ahead and launch the fetchmail (via /etc/init.d/fetchmail) and let it fail.

A failure AUTH should be logged in the /var/log/mail.info

If there are any problems that you want to see more information about, up the verbosity of fetchmail's messages by editing

/etc/default/fetchmail

and adding

OPTIONS="-v"

after a restart of fetchmail with /etc/init.d/fetchmail restart, the mail.info file will be full of all sorts of details.  Remember to comment this back out and restart fetchmail once problems are solved.  The increase in data in mail.info is at least 20 fold.

verified 10/7/2016 jws

***************************
setting up for imap mode fetch from gmail

http://daemonforums.org/showthread.php?t=5590


--30--

Monday, October 3, 2016

Upload Youtube videos from Linux command line

This might be handy for uploading surveillance videos or the like, generated on a system.

From Jean-Luc

http://www.cnx-software.com/2014/02/09/how-to-upload-youtube-videos-with-the-command-line-in-linux/

mkdir youtube-upload
cd youtube-upload
wget https://github.com/youtube/api-samples/raw/master/python/upload_video.py

Google API download

wget https://google-api-python-client.googlecode.com/files/google-api-python-client-1.2.tar.gz
tar xzvf google-api-python-client-1.2.tar.gz
cd google-api-python-client-1.2/
mv apiclient/ oauth2client/ uritemplate/ ..
cd ..

Sunday, October 2, 2016

Multiple Notepad++ instances


Notepad will allow multiple instances to be present.  This isn't a huge problem with windows prior to 10 with workspaces, but with windows 10, you get workspaces, and want to edit things on each workspace.

this is a simple fix to the shortcut on launch.

On Windows 10, there is a "pin to start' capability, so the trick is to copy the notepad++ shortcut, rename it, and add the shortcut option to the copy.

option is:  -multiInst

Pin that one to the start menu.

http://superuser.com/questions/549782/want-2-instances-windows-of-notepad

  1. Create a new shortcut to your notepad++.exe
  2. Go to Properties of the shortcut (Right-click on it)
  3. Append -multiInst to the target line. It should look like this 

Viewing Foscam FI9803P stream with VLC


Use VLC stream viewing to view cameras:  how to construct URLs

Model FI9803P camera

http://foscam.us/media/mconnect_uploadfiles/f/i/fi9803p%20user%20manual.pdf

2.4 Using the VLC player This camera supports RTSP streaming, here you can
view the camera using VLC player.
RTSP URL
rtsp:// [user name][:password]@IP: RTSP port number/videosream

The part in the square bracket s may be omitted.  user name & password:
The user name and password to access the camera.
This part can be omitted.
IP: WAN or LAN IP address.
Videostream: Here support some mode .
When the network speed is bad, here you had better select videoSub.
For example: IP: 192.168.1.11
RTSP Port number : 554
User name : admin
Password : 123
Here I can enter one of the following URLs in the VLC.
1) rtsp://admin: 123 @192.168.1.11: 554 /videoMain
2) rtsp:// @192.168.1.11: 554 /videoMain
3) rtsp://: 123 @192.168.1.11: 554 /videoMain
4) rtsp://admin@192.168.1.11: 554 /videoMain

Open the VLC, and go to Media  Open Network Stream option, then enter the
URL into VLC

Shortcuts:

Create windows shortcut by copying the VLC shortcut, and add it to the "target:" field
of the shortcut

On linux create a shortcut on the desktop by whatever means and add the rstp URL
to the target address as well.

xx